Premiere Pro pluginAlpha
Captions inside Premiere Pro
Transcribe Hindi, Hinglish and 11 more languages without leaving your timeline. Pick any AutoCap template and the captions land on their own track — with the same account, minutes and templates as the web editor.
Early alpha. The plugin is new and still growing: some things the web editor does aren't in the panel yet, and it will change quickly. Tell us what you need.
Version 1.1.1 · 179 KB · Premiere Pro 2023 or later · Free to install

The AutoCap panel docked in Premiere Pro. The captions go on a track of their own, above your footage.
How it works
From your timeline, back to your timeline
No exporting your video, no uploading it, no importing a caption file. The panel does the whole round trip.
- 1
Open the panel
Window › Extensions › AutoCap. Sign in once with your AutoCap account and the panel remembers you.
- 2
Caption this sequence
The panel exports the sequence's audio, transcribes it, and draws every caption with the template you picked — on your own computer.
- 3
Captions land on your timeline
On their own track, above your footage. Move, trim or switch them off like any clip, fix any word, or redraw them with another template.
What you get
The web editor's captions, where you edit
Everything that makes AutoCap captions look the way they do, without taking your edit anywhere.
Every template in the editor
The built-in styles and every published template, including the ones designed for Gujarati, Tamil, Bengali and more. Their fonts download when first needed — nothing to install.
12 languages, three ways to write them
Auto-detect, or choose the language. Captions in its own script, romanised for Hinglish, or translated to English.
One account, one allowance
Your plan, minutes and watermark work exactly as they do on the website. Transcribing in Premiere uses the same minutes; redrawing uses none.
Your video stays on your computer
Only the sequence's audio is sent to be transcribed. The captions are drawn on your machine.
Fix any word
Names and brands are where transcription slips. Click a word to correct it, delete it, split or join captions, or choose the keyword — then redraw, for no minutes.
All of it, or just a part
Set In and Out marks to caption one section of a long edit. Caption the same part again and the new captions replace the old ones.
Install
Installed in a minute
Choose your computer. The installer puts the panel in your own Adobe folder — nothing system-wide, and no administrator password.
- 1
Download and extract the zip
Right-click it › Extract All. The installer cannot run from inside the zip.
- 2
Double-click Install AutoCap
In the extracted folder. If Windows asks whether to run it, choose Run — or More info › Run anyway. No administrator rights are needed.
- 3
Close Premiere Pro and open it again
Close it completely. Premiere looks for new panels only as it starts.
- 4
Window › Extensions › AutoCap
Dock the panel wherever you like; Premiere remembers where it goes.
Prefer PowerShell?
This downloads the same files, checks they arrived whole, and installs them — steps 1 and 2 in one.
irm https://www.autocap.in/install/premiere.ps1 | iex- 1
Download and open the zip
Safari unzips it for you; otherwise double-click it. You get a folder called AutoCap for Premiere Pro.
- 2
Right-click Install AutoCap › Open
macOS asks once whether to open it, because it came from the internet — choose Open. On macOS 15, if there is no Open button, go to System Settings › Privacy & Security and click Open Anyway.
- 3
Quit Premiere Pro and open it again
Quit completely with ⌘Q — closing the project is not enough. Premiere looks for new panels only as it starts.
- 4
Window › Extensions › AutoCap
Dock the panel wherever you like; Premiere remembers where it goes.
Prefer Terminal?
This downloads the same files, checks they arrived whole, and installs them — steps 1 and 2 in one.
curl -fsSL https://www.autocap.in/install/premiere.sh | bashPremiere Pro 2023 or later, on macOS or Windows. The installer also turns on the setting Premiere needs for panels from outside Adobe's marketplace — why.
Using it
Your first captions, step by step
Sign in once; after that it is the same few clicks every time, and any word can be fixed afterwards.
- Step 1
Sign in
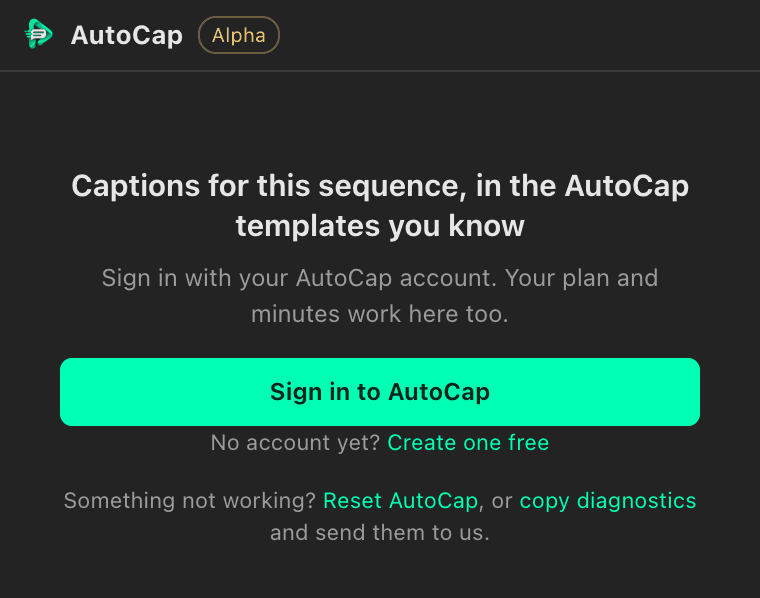
Open Window › Extensions › AutoCap and click Sign in to AutoCap. autocap.in opens in your browser — sign in there if you aren't already. No account yet? You can make one free on the same page.
- Step 2
Allow the panel
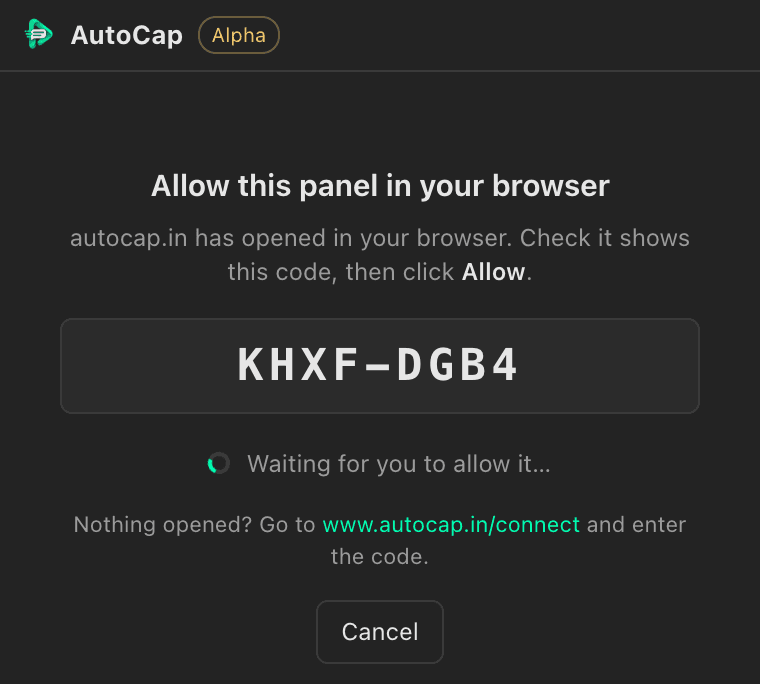
Check the code on the page matches the one in the panel, then click Allow. The panel stays signed in; one account can use it on up to three computers.
- Step 3
Choose the language and a template
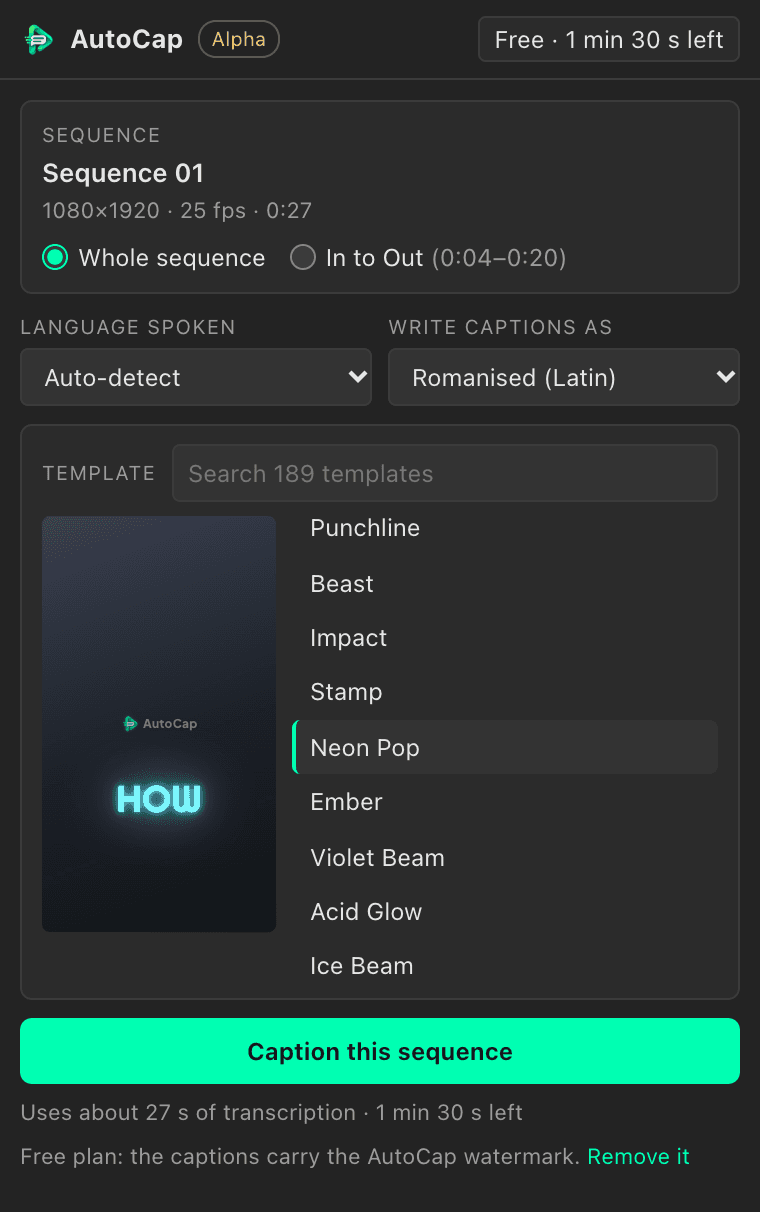
Auto-detect suits most clips. Choose how the captions are written — native script, romanised for Hinglish, or English translation — then a template. The preview shows it as you choose.
- Step 4
Caption the sequence
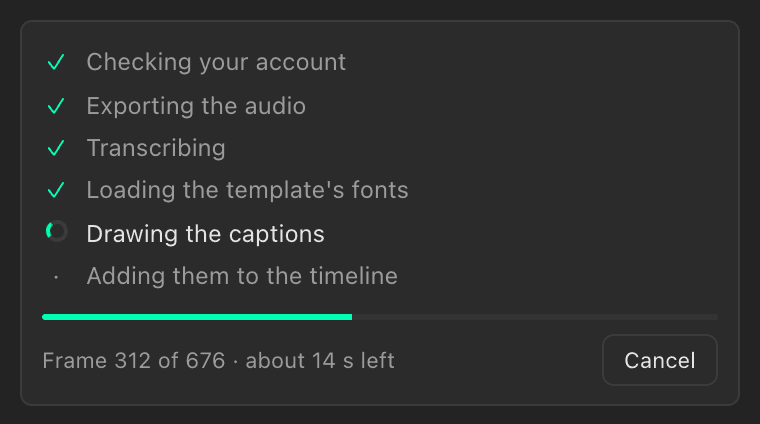
Click Caption this sequence. The panel exports the audio, transcribes it and draws the captions; a 30-second reel takes about a minute.
- Step 5
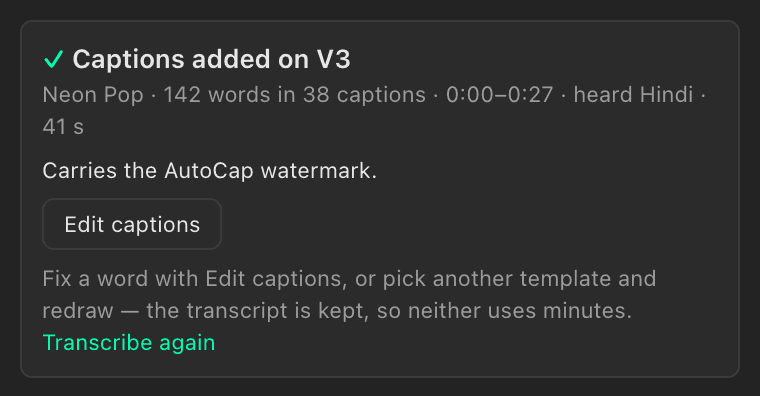
Done — they're on your timeline
The captions sit on the top video track, over your footage. For another look, pick a different template and click Redraw captions: the transcript is kept, so it uses no minutes.
- Step 6
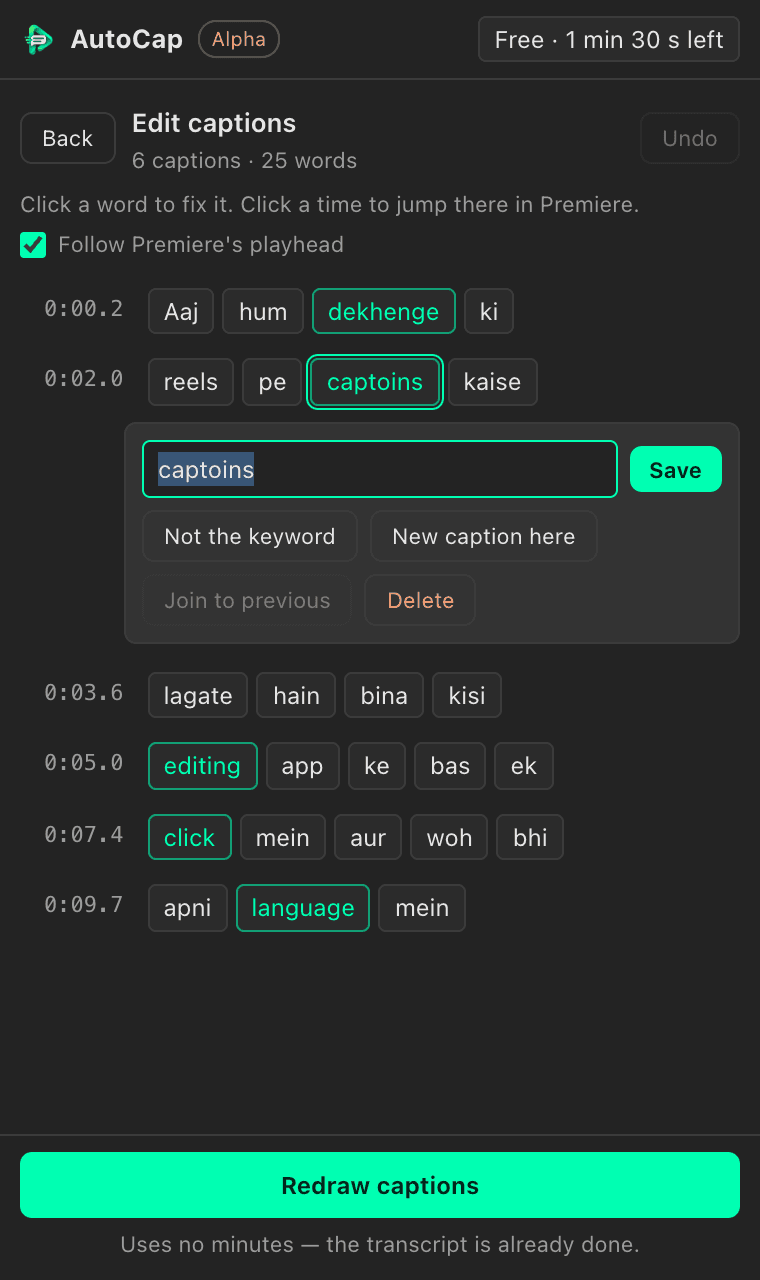
Fix any word
Click Edit captions. Click a word to correct it — its timing stays locked to the audio — or delete it, start a new caption there, or make it the keyword. Click a caption's time to see it in Premiere. Then Redraw captions: no minutes used, and your edits are kept for next time.
Just part of a long edit?
Set In (I) and Out (O) marks around it, then choose In to Out in the panel. Only that part is transcribed.
Keep the AutoCap Captions folder
It sits next to your project file and holds the captions Premiere plays. Move or archive it with the project, like any other media.
Plans
One account for the web and Premiere
Installing the plugin is free. Your plan decides the rest, exactly as it does on the website.
Free
₹0
- Captions carry the AutoCap watermark
- 2 min of transcription a month
- Up to 60 s per caption run
Starter
₹299/month
- No watermark
- 90 min of transcription a month
- Up to 5 min per caption run
EditorPopular
₹499/month
- No watermark
- 3 hours of transcription a month
- Up to 5 min per caption run
Pro
₹999/month
- No watermark
- 8 hours of transcription a month
- Up to 5 min per caption run
Only need it once? Remove the watermark from a single video for ₹49. Compare plans
Help
Troubleshooting and questions
What to check when something doesn't look right, and what people ask before installing.
Is the plugin finished?
No — it is an early alpha. Captioning a sequence with any AutoCap template works today; some things the web editor does are still on their way to the panel, and it will change quickly. The panel tells you when a new version is out, and we would like to hear what you need.
Something isn't working
Try Reset AutoCap: it is in the panel's menu (your plan, top right) and on its sign-in screen. It signs you out, clears the panel's settings and downloads its fonts and templates again — the captions in your projects stay, and so do your saved transcripts unless you tick the box. Then sign in again. Still stuck? Click Copy diagnostics and send them to us.
AutoCap isn't under Window › Extensions
Quit Premiere Pro completely — closing the project is not enough — and open it again: Premiere only looks for new panels as it starts. The plugin needs Premiere Pro 2023 or later. On Windows, make sure the zip was extracted before you ran the installer. If it still isn't listed, run the installer again.
The panel opens, but it's blank
Run the installer again, then restart Premiere Pro. The installer turns on the setting Premiere needs to load the panel, and something — often another plugin's installer — can switch it off.
Why does the installer change a Premiere setting?
Premiere only loads panels installed from outside Adobe's marketplace when its PlayerDebugMode setting is on. The installer turns it on for your user account — it is the step Adobe itself gives for panels installed this way — and changes nothing else.
Does it use my minutes from the website?
Yes — it is one account with one allowance. Transcribing in the panel uses the same minutes as the web editor. Redrawing a sequence with another template uses none, because the transcript is kept.
Is my video uploaded?
No. Only the sequence's audio is sent, to be transcribed. The captions are drawn on your own computer.
Where are the caption files?
In a folder called AutoCap Captions next to your project file. Keep it with the project: the captions are image sequences that Premiere reads from there.
Can I edit the words?
Yes. After captioning, click Edit captions: fix a word's spelling (it stays timed to the audio), delete words, start or join captions, and choose each caption's keyword. Then Redraw captions — the transcript is kept, so it uses no minutes, and your edits are saved with it for next time.
Can I caption a long timeline?
Each caption run covers up to 5 min on a paid plan and 60 s on Free. For a longer edit, set In and Out marks around each part and caption them one at a time.
A template shows in the wrong font
The panel downloads each template's fonts the first time you use it. If the connection dropped, the panel says so — reconnect and redraw.
The sign-in code expired
Codes last ten minutes. Click Sign in to AutoCap again for a new one.
How do I uninstall it?
Run Uninstall AutoCap from the download. It removes the panel, its sign-in and its downloaded fonts; captions you have already made stay in your projects.
Does it work in After Effects or DaVinci Resolve?
Premiere Pro only, for now.
Still stuck? Click Copy diagnostics in the panel — on its sign-in screen or in its account menu — and send them to us.
Caption your next edit without leaving it
Free to install. Sign in with your AutoCap account, or make one free — the plan you have on the web works in Premiere too.